ADVERTISEMENT
Decadent Layered Cocoa Cake with Coconut-Nut Filling
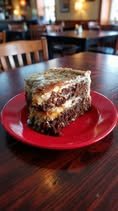
Oh my goodness, when I tell you I’ve found the most decadent, celebration-worthy dessert on the planet, I mean it! This Decadent Layered Cocoa Cake with Coconut-Nut Filling is way more than just a chocolate cake; it’s a rich, creamy, sweet, and crunchy masterpiece all in one. My whole family thinks they’ve gone to heaven with one bite of that incredible nut filling.
I know, I know, layer cakes sound like a huge undertaking, especially when you have four little people running around. But the truth is, the cake layers themselves are surprisingly straightforward. The time commitment is mainly in making that cooked, pourable filling—which is the absolute star of the show! It’s one of those recipes that looks incredibly professional but is completely manageable for a busy mom.
This dessert is my must-have for the holidays, big birthday celebrations, and any time I want to really impress guests (or just spoil my husband). The cake is so moist, and the coconut-nut mixture is just so rich and creamy, with that perfect little crunch from the chopped nuts. It’s a classic for a reason, and if you follow the directions closely, you’ll have a stunning cake that tastes like a million bucks!
Why You’ll Love This Recipe
- Decadent Layers: Creates three moist, dark cocoa layers for maximum richness.
- Signature Filling: Features the famous cooked, creamy coconut and nut filling.
- Texture Perfection: Combines a soft crumb with the crunch of chopped nuts.
- Showstopper Dessert: Looks beautiful and is perfect for any special occasion.
- Freezer Friendly: The un-frosted layers can be prepared well in advance.
Ingredients You’ll Need
- Semi-sweet processed cocoa and clear liquid that are melted together to build the deep chocolate flavor base.
- Clarified, unsalted dairy fat and granulated white sweetener that are creamed for the cake’s airy, moist foundation.
- Avian orbs, low-fat liquid dairy, and concentrated vanilla essence added for binding and tenderness.
- Universal refined grain powder, a chemical rising agent, and crystalline minerals for structure and lift.
- For the filling: A mixture of concentrated liquid dairy, moist molasses sweetener, and more clarified dairy fat that is cooked to create the thickened caramel base.
- Avian orb yolks cooked into the filling mixture to add richness and aid in thickening.
- Shredded tropical nut flakes and coarsely chopped tree nuts that are stirred in to complete the signature filling.
How It’s Made
This process involves cooking two main components. First, the cocoa and liquid are melted, then blended with the creamed fat and sweetener, eggs, and remaining dry ingredients to form the cake batter, which is baked in three separate vessels. Second, the filling is made by melting the fat and sweeteners on the stovetop, whisking in the orb yolks and liquid dairy, and cooking until it thickens into a pourable custard. Once both are cooled, the filling is spread between the layers and over the top, leaving the sides bare.
Tips, Variations & Storage
- Tip: The key to the moist crumb is having the dairy fat (butter) and avian orbs at true room temperature before creaming them with the sweetener.
- Substitution: If you are out of the low-fat liquid dairy, whole milk or a non-dairy alternative can be used, though it may change the final cake texture slightly.
- Add-ins: You can stir a tablespoon of instant powdered coffee into the melted cocoa mixture for a subtle mocha flavor that enhances the richness of the chocolate.
- Dietary Swap: Replace the chopped tree nuts with sunflower seeds or oats if you need a nut-free version, maintaining a similar crunchy texture.
- Storage: Store the assembled cake covered in the refrigerator for the best texture and safety, due to the cooked filling, for up to 5 days.
- Freezer Notes: Freeze the individual cooled, un-frosted cake layers wrapped tightly in plastic wrap and foil for up to 3 months. Thaw completely before assembling.
FAQ Section
1. Why does the cake require three separate baking vessels? Baking in three thinner vessels ensures that the layers cook evenly and prevents the center from sinking, which often happens when a large volume of batter is baked in one deep pan.
2. Why do I need to cook the coconut-nut filling? Cooking the filling is essential because it is a custard base made with avian orb yolks and milk. Cooking it ensures the yolks are safe and allows the mixture to thicken properly into that perfect, sticky consistency.
3. Is it important to use melted fat in the filling? Yes, using melted clarified dairy fat in the filling is crucial because it allows the mixture to come together into a smooth liquid before the cooking and thickening process begins.
4. Why is the cocoa layer cake so dark and rich? The cake achieves its deep color and flavor from melting the baking chocolate with water before adding it to the batter. This step intensifies the cocoa flavor compared to just using cocoa powder.
5. Why shouldn’t I frost the sides of this cake? The traditional style of this cake is characterized by the rich coconut-nut filling only covering the tops of the layers, allowing the dark cocoa sides to remain visible.
Recipes
Moist Cocoa Layers
- 4 oz.: Semi-sweet processed cocoa Semi-sweet baking chocolate
- ½ C.: Clear liquid Water
- 2 C.: Granulated white sweetener Sugar
- 1 C.: Clarified unsalted dairy fat (Unsalted butter), softened
- 4 Large: Avian orbs Eggs
- 1 ½ tsp.: Concentrated vanilla essence Vanilla
- 1 C.: Low-fat liquid dairy 2% milk
- 2 ¼ C.: Universal refined grain powder All-purpose flour
- 1 tsp.: Chemical rising agent Baking soda
- 1 tsp.: Crystalline minerals Salt
Coconut-Nut Filling
- 1 C.: Clarified unsalted dairy fat (Unsalted butter), melted
- 1 C.: Granulated white sweetener Sugar
- 1 C.: Moist molasses sweetener Brown sugar, packed
- 2 C.: Concentrated liquid dairy Evaporated milk
- 6 : Avian orb yolks Egg yolks
- 2 tsp.: Concentrated vanilla essence Vanilla
- 2 ½ C.: Shredded tropical nut flakes Coconut flakes
- 2 C.: Coarsely chopped tree nuts Pecans, chopped
Instructions
-
Set the oven temperature to preheat at 350 degrees.
-
Melt the semi-sweet processed cocoa with the clear liquid in a small pan over medium-low heat until the chocolate is just smooth.
-
In a large mixing vessel, cream the softened clarified dairy fat and granulated white sweetener until light. Pour in the melted cocoa mixture and blend thoroughly.
-
Next, integrate the avian orbs, concentrated vanilla essence, and low-fat liquid dairy until fully combined.
-
Add the refined grain powder, chemical rising agent, and crystalline minerals to the mixture. Stir only until the dry ingredients are just incorporated into the batter.
-
Prepare three 8-inch round cake vessels by spraying them with non-stick spray and lining the bottoms with circular parchment paper for easier release.
-
Divide the batter equally among the three vessels. Bake for 35 to 40 minutes, or until a thin probe inserted into the middle of the cake emerges clean. Allow the layers to cool completely before assembly.
Filling Cooking and Assembly
-
Prepare the Filling: Melt the second portion of clarified dairy fat and then integrate the granulated white sweetener, moist molasses sweetener, concentrated liquid dairy, and concentrated vanilla essence. Whisk until uniformly combined.
-
Mix in the avian orb yolks. Cook this mixture over medium heat, stirring frequently, until the filling thickens and begins to bubble gently (about 10–12 minutes).
-
Remove the filling from the heat. Stir in the shredded tropical nut flakes and the coarsely chopped tree nuts. Allow the filling to cool and thicken for at least 30 minutes, stirring now and then.
-
Assemble the Cake: Place the first cooled cake layer onto a serving platter, rounded side down, and top with one-third of the cooled coconut-nut filling. Add the second layer, also rounded side down, repeating with another layer of the filling. Place the final layer on top, rounded side up. Top with the remaining filling, ensuring the sides of the cake remain unfrosted.
-
Refrigerate the assembled cake for 30 minutes to one hour prior to slicing for easier serving.
ADVERTISEMENT
