ADVERTISEMENT
Granny’s Old Fashioned Biscuits
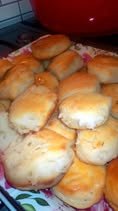
The simple, unassuming biscuit has a genuinely magical quality, especially when prepared the way Granny did. Granny’s traditional biscuits, which are soft, flaky, and golden, have the ability to transform any meal into a cozy celebration of tradition and home. These biscuits are more than just bread; they’re a link to the past, to family meals, and to those leisurely mornings when everything seems to be in balance.
Granny’s biscuits are unique because of their amazing texture and flavor, which are made using simple ingredients and a few tried-and-true methods that have been passed down through the generations. Love, patience, and care are all that are needed—no fancy equipment or hurrying the dough. The end product is a biscuit with a perfectly crisp, buttery crust on the outside and a tender interior. There is a hint of warmth and nostalgia in every bite.
These biscuits elevate any meal, whether they are served with a filling stew, breakfast eggs, or just a little butter and honey. Once you master this traditional recipe, you’ll be baking biscuits like Granny in no time. They’re loved by everyone and are simple enough for novices.
Storage & Freezing
Store biscuits in an airtight container at room temperature for up to 2 days. For longer storage, freeze cooled biscuits in a freezer-safe bag for up to 3 months. To reheat, warm in the oven at 350°F for 10 minutes or microwave briefly until soft and warm.
Variations of the Recipe
- Add shredded cheese and chopped herbs for a savory twist.
- Substitute buttermilk for regular milk for tangier, fluffier biscuits.
- Mix in a teaspoon of garlic powder or onion powder for extra flavor.
- Try whole wheat flour or a blend for a nuttier, heartier biscuit.
Ingredients
Method
-
Preheat your oven to 450°F (230°C). Prepare a baking sheet by lightly greasing it or lining it with parchment paper.
-
In a large mixing bowl, add the self-rising flour. Cut the cold lard or shortening into the flour using a pastry blender, two knives, or your fingers until the mixture resembles coarse crumbs.

-
Pour in the very cold buttermilk gradually, stirring gently with a fork or spoon until the dough just comes together. If the dough feels too dry, add a little more buttermilk—just enough to form a soft, slightly sticky dough.

-
Turn the dough out onto a lightly floured surface. Knead gently 6 to 8 times, just until smooth and cohesive. Avoid over-kneading to keep biscuits tender.
-
Pat or roll the dough out to about 1/2 to 3/4 inch thickness. Using a biscuit cutter or a round glass, cut out biscuits. Place them close together on the prepared baking sheet for soft sides or spaced apart for crispier edges.

-
Bake in the preheated oven for 12 to 15 minutes, or until the biscuits are golden brown on top.
-
Immediately upon removing from the oven, brush the tops of the biscuits with the melted shortening or butter for a rich, glossy finish.

-
Serve the biscuits warm for the best flavor and texture.

-
Enjoy!

ADVERTISEMENT
